A piece I recently worked on was a dining table made from Black Walnut. I forgot to ask the customer when the table was made, but it was made by his father, from a photo. Even the table glides were made by hand! I am guessing by the style of the table it was made around 1970, The table was in good shape, but the finish had begun to deteriorate and the top had also bleached in the sun. Other than refinishing the top, the legs were a little scuffed and needed to be touched up.
Below is a photo of the table as it came to me.
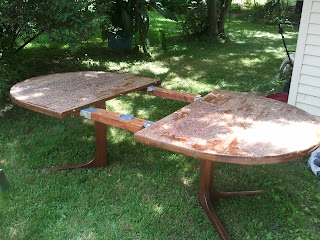
While removing the finish, I decided to take a few photos of what that process looks like. The chemical stripper reacts with different finishes in different ways. With a varnish, probably a polyurethane finish in this case, the finish literally starts to peel off of the wood in solid sections. I have included three photos below, one of the whole table,the second a detail shot of one end, and a third that is a close up, to demonstrate this.
After the finish was removed, the table was brought into the shop where it was sanded and then stained. This photo shows the table after all of the scratches on the surface were sanded out.
This next photo shows the table with a few coats of finish on it. The table had also been stained at this point to match the base.
These next few photos were taken near the end of the finishing process. Each coat is applied by vigorous rubbing, first in small circles and then straightened out with the grain. The whole process takes a bit of time with applying the finish and subsequent buffing involved. after the finish dries for about 30 minutes the surface is abraded with fine steel wool and the process is repeated. The result is that the pore of the wood fills and the finish stays close to the surface of the wood, creating a mirror like finish in certain cases. The photos below demonstrate this very well.
After the finish is applied, the finish is abraded one last time and paste wax is applied to the surface to protect it from liquid damage. These last photos show the table completed and ready for delivery.
A blog to chronicle the restoration of antique furniture and the construction of new furniture http//www.johnmarkpower.com email: info@johnmarkpower.com
Welcome to my blog which follows my furniture restoration business. Please feel free to comment at the bottom of the post, and if you would like a response please leave your email address. you can also contact me directly at info@johnmarkpower.com. And by all means, if you like something please feel free to share it.
Wednesday, June 20, 2012
Wednesday, June 13, 2012
Reproduction Walnut Hall Tree Part 5: The Completed Original and Reproduction Hall Tree
This post is the last in a series documenting the restoration of a 19th century Oak hall tree and the fabrication of a reproduction made from 50+ year old Black Walnut. All told, there was well over 100 hours in the entire process. I start off with some photos of the original followed by some detail shots of the reproduction.
These photos are followed by a few photos of the original beside the reproduction hall tree. This was a marvelous project and called on a variety of skills. It is gratifying to see the project come to completion, but I certainly had fun in the process!
The Reproduction
The Original Beside the Reproduction
Subscribe to:
Posts (Atom)


